Showing posts with label twine. Show all posts

Tuesday, September 20, 2016

BoBunny Toy Box Projects

Hello scrappers!


Bobunny's toybox collection is so much fun! The bright colours and paper designs lend themselves to so many childhood themed projects! 

We've had this collection in our stash for a while, just waiting for inspiration to hit! When I saw a photo of a small gift box, I knew that was it. 


I created this box by cutting the template out on my Cricut (Cartridge: Box it up). I measured each side and cut out 4 squares 1/4 inch smaller than the side of the box, from 4 different papers in the collection. 

I edged the squares with chalk for effect, and adhered them to the sides and top of the box. 

For the topper, I threaded some baker's twine through a button and tied it at the top. I adhered it to the lid of the box with liquid glue. 

For the box front, I taped a piece of clear acetate to the inside of the box, covering the circle. I fussy cut some embellishments to decorate.

Finally, I filled it with gummy worms (I may have snuck one...or two!)

This treat box is on it's way to a special kid this week! 

I wasn't done with this collection yet! 

I needed to create a layout using these colours! One of the patterned cardstock sheets has an arrow pattern on it:


I've been wanting to try a lattice style layout for a while, and this paper was perfect for it! 

Here's the layout:


I cut the strips along the lines, and trimmed the top and bottom to define the arrow. I used varying lengths to add some interest. The leftover trim from the arrows were used at the side of the photo. 

I weaved the strips in and out of each other and tried to keep them straight while I glued them down (easier said than done!). 

I thought twine would give some great movement to the layout, especially since it's such a fun photo! The title was letters I had in my stash, and of course no baby layout is complete without some buttons! 

There we have it, another layout down and ready for the album! 

Lori
xo

Saturday, September 17, 2016

October Afternoon Farm Fresh Journaling Cards Layout

Hello Scrappers!

I absolutely LOVE using journaling cards on layouts! This is the Farm Fresh collection from October Afternoon:


I love the soft colour palette of this collection, it lends itself well to either coloured or black & white photos. These cards leave so much space for journaling!

 I thought I'd use this pocket style page for a traditional layout. I was able to use every single card on this layout!

Usually, journaling cards measure 3x4, however these cards actually measure 2.5 x 4. This allowed me to get 4 cards across the top of the layout with white space in between. 

The 3 cards in the middle are actually smaller than the others. They measure 2.5 x 3.5. This worked out great because I was also able to lay those across the middle with white space between them. 

Here's the layout:


I'm one of those people that think most photos must have a mat! You could pull any colour from the cards, I chose red so it would really bring out the colour of the fruits and veggies. 

The twine border was a bit tricky. I used Tombow Mono liquid glue to adhere it to the page. 

Here's how I did it: 

1. Cut a piece of twine about twice the length of the perimeter of your mat. Always cut longer than you think you need. It will look funky if your twine is too short and needs to be fused halfway. 

2. Starting at a point where you know you will be placing an embellishment over top, draw a thin line of glue in the shape you want your twine to lay. 

3. Working very slowly, lay your twine over the glue and hold it down until you're confident it's stuck. Continue around the mat, twisting and twirling the twine to create the effect we did here.

4. When you get all the way around your mat, cut your twine as close to the beginning of the border as possible. Cover with an embellishment, I used an apple from Jolee's Boutique that was in my stash. 


 A great tip for getting the journaling cards straight is to place your layout on your craft mat, lined up along the grid. Use a ruler to connect 2 of the grid lines and hold the ruler straight while you put your cards into position. 


I added a light brown doily, and cut a title on my Cricut and it all came together.

I have a great photo of the kids picking strawberries at a local farm for this layout.

We're headed back to the farm again this weekend! Can't wait! Have a great day!

Lori
xo


Thursday, September 8, 2016

Doodlebug's Anchor's Aweigh Layout!

Hello scrappers!

Doodlebug's 'Anchor's Aweigh' collection has to be one of the cutest nautical collections I've seen! 

This paper has 'boat-themed layout' written all over it! Here's what we created with it:


*The title, sun and crab are not from the Anchor's Aweigh collection. I found them in my stash and knew they'd go great! 

First I started on the hexagon pattern. It may seem like a big job at first, but it's actually pretty easy. Just punch a bunch of hexagons in the paper you're using and lay them out in the general area you want them. The thing is to make absolutely, 100% positive that the first hexagon you glue down is straight. If it's not, it's a ripple effect from there, and they'll all look crooked. It's best to start in a corner. 

The boat and anchor embellishments are actually from the 12x12 quote sheet:


I just trimmed them very carefully, then I  matted them on plain green cardstock. 

Now on to my very favourite part. After I completed the hexagon pattern, it still looked a bit plain to me. Needed something. 

When in doubt....always add baker's twine! 


I used a fine tip adhesive and very carefully glued around the edge of the hexagon and laid the twine into it. I did that on a few hexagons and I think it really stands out! 

I have the perfect picture of my kids on the boat at camp for this layout! 

Thanks for looking! 

Lori
xo


Saturday, August 27, 2016

Birthday Layout using the Memory MISTI!

Hello Scrappers!

We're hooked on using our Memory Misti to make our own background papers for our layouts! We used our 12x12 Misti and a balloon stamp to create a birthday rainbow!

Here's the layout!


Here's how I made it! 

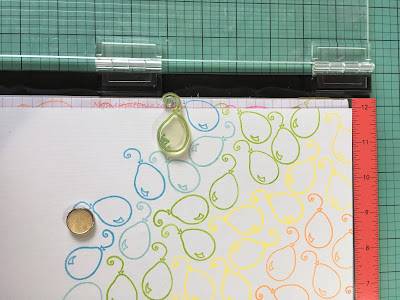
I placed a 12x12 sheet of white cardstock in my Memory Misti. I thought balloons would be a great stamp for a birthday layout. This stamp is by Forever in Time.

Starting in the top right corner, I drew a very light pencil line to the bottom left corner. This way I knew that on one side of the line I needed to stamp pink, orange and yellow. On the other side would be green, blue purple. 

In the top left corner I started stamping the balloon in pink, then orange. 


The Misti, leaves a bit of room to stamp around the edge of your paper, which makes it super easy to stamp off the edge a bit. 

I continued down the page, changing colours as needed. 


Once I reached my pencil line, I erased it, and knew it was time to start the green balloons. 

I needed to rotate my cardstock in order to have more room at the edge for the stamp to stick to the Misti. There is a bit more give along the hinge side of the Misti, so I rotated toward that side. 


Before long, the entire page had been stamped in rainbow balloons!


I trimmed 1 inch off of each edge, and cut the cardstock into 4 equal sized squares. 


I chose a sheet of navy blue cardstock for the background, so it would really make the bright colours pop. The frame still seemed a bit unfinished, so I grabbed the twine to create a border. 

I marked the corners using a pencil. Using a hole punch, I punched holes to thread the twine through. I ran the twine through the holes, and taped it to the back of the layout. I'll cover the holes later with an enamel dot. 


The finished border:


I adhered the balloon stamped cardstock squares to the background, and added a photo and title. I used adhesive rainbow enamel dots to cover the holes from the twine. 

Here's the finished layout again!


Layouts that include a lot of stamping are definitely a labour of love, but so worth it in the end! 


Thanks for looking!

Lori
xo