Tuesday, August 30, 2016

Halloween Card using Lawn Fawn's Mommy & Me!

Hello crafters! 

Fall is actually one of my favorite times of the year. I looove the bright reds, oranges and yellow colors, the feeling of the crisp air, pumpkins, corn stalks and hay bales. But.... I reluctantly am getting on board with the "Halloween crafts in August thing".  After a big push from my co-workers, I thought maybe starting with something small like a card  would ease me into the season.  I'm just not ready to accept that summer is coming to an end!


Lawn Fawn's 'mommy and me' stamp and die set feature 2 owls, a mom and a baby. They're super cute, and owls are great for fall/Halloween crafts!

Here's the card! 


I used a 6.5" x 5" off white card base and cut navy blue cardstock for the trim. The orange polka dot paper is from the  Pebbles 2012 collection. 

The tree was cut in Cricut Design Space. The cartridge is Monster Bash.

I stamped and die cut the owls and colored them with colored pencils in yellow & brown tones. Cute but spooky! 

Enjoy the card, Halloween will be here before you know it! 

Lori
xo

Saturday, August 27, 2016

Birthday Layout using the Memory MISTI!

Hello Scrappers!

We're hooked on using our Memory Misti to make our own background papers for our layouts! We used our 12x12 Misti and a balloon stamp to create a birthday rainbow!

Here's the layout!


Here's how I made it! 

I placed a 12x12 sheet of white cardstock in my Memory Misti. I thought balloons would be a great stamp for a birthday layout. This stamp is by Forever in Time.

Starting in the top right corner, I drew a very light pencil line to the bottom left corner. This way I knew that on one side of the line I needed to stamp pink, orange and yellow. On the other side would be green, blue purple. 

In the top left corner I started stamping the balloon in pink, then orange. 


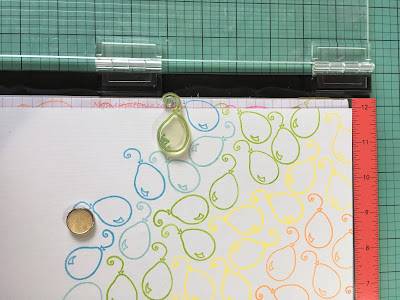
The Misti, leaves a bit of room to stamp around the edge of your paper, which makes it super easy to stamp off the edge a bit. 

I continued down the page, changing colours as needed. 


Once I reached my pencil line, I erased it, and knew it was time to start the green balloons. 

I needed to rotate my cardstock in order to have more room at the edge for the stamp to stick to the Misti. There is a bit more give along the hinge side of the Misti, so I rotated toward that side. 


Before long, the entire page had been stamped in rainbow balloons!


I trimmed 1 inch off of each edge, and cut the cardstock into 4 equal sized squares. 


I chose a sheet of navy blue cardstock for the background, so it would really make the bright colours pop. The frame still seemed a bit unfinished, so I grabbed the twine to create a border. 

I marked the corners using a pencil. Using a hole punch, I punched holes to thread the twine through. I ran the twine through the holes, and taped it to the back of the layout. I'll cover the holes later with an enamel dot. 


The finished border:


I adhered the balloon stamped cardstock squares to the background, and added a photo and title. I used adhesive rainbow enamel dots to cover the holes from the twine. 

Here's the finished layout again!


Layouts that include a lot of stamping are definitely a labour of love, but so worth it in the end! 


Thanks for looking!

Lori
xo

Wednesday, August 24, 2016

Grid Layout & Birthday Card using Echo Parks' Dino Friends


Echo Park Dino Friends Layout & Card

Good morning scrappers!

Dinosaurs never go out of style for children! We had a great time using the Dino Friends collection from Echo Park Paper to create a card and layout!

Let's start with the card!


We started with a 5.5 x 5.5 off white card base. We used paper from the collection for the green mat, and the bottom third of the card. The Dino egg paper has such a great colour palette!

We used plain blue cardstock from our stash and embossed it using the embossing folder that is also part of the Dino Friends collection. It gave a great effect! We used thin yellow washi tape to divide the different papers. 


The collection also features stamps! "Rawr means I love you in dinosaur" is the stamp we used, isn't that the cutest sentiment! 


This card is on it's way to a 'rawrsome' birthday boy this week! 

On to the layout! 

Making a grid layout with blocks of varying sizes is not as much fun as it sounds! Trying to find the right balance of sizes while making sure the edges were even was challenging, but we pulled it off!


We used the same stamp set as the card to embellish the paper. The great thing about this collection is that some of the papers are not dino themed, but still fit in with the theme. 

Another great product in the collection is the chipboard accents. We used one for the 'You are so rawrsome' title at the top! 


My kids & I went to an awesome dinosaur exhibit with animated dinos last year, and got a great family photo that will go great on this layout! 

Thanks for looking!

Lori
xo


Thursday, August 18, 2016

Back to School Scrapbook Titles

Hello Scrapbookers! 

It's almost the most wonderful time of the year again, ...no not Christmas, back to school!!!! Yahoo!

Just kidding, actually, I love having the kids home, no lunches to make, no routines, lots of time just hanging out together. 

But back to school is coming soon for us and has already started for some of you,  so I created a list of some cute scrapbook titles for inspiration for your own back to school layouts!


Now I'm going back to soaking up every ounce of summer that I can before school starts!

How do you feel about back to school, are you putting on your party hat or crying in your lemonade because summer is over?

Happy scrapbooking!

Lori
xo

Tuesday, August 16, 2016

How to make a Lawn Fawn Baby!

Hello crafters! 

By now you probably know that I love to use different products together to see what I can come up with. When Lawn Fawn released the 'Little Bundle' collection, I went crazy making baby cards, but I was missing one essential stamp. A baby! 

It was almost as though the good folks over at Lawn Fawn heard my cry for help because in the next release was...mermaids! Wait..what? Mermaids and babies? Confused? Well, when 2 stamps collections love each other very much... nevermind, I'll just show you!


This little guy has the head of the boy mermaid and the jammies from the Little Bundle collection. Around the studio we simply call him 'Merbaby'! 

Here's how we made this little cutie!

You'll need both the 'Little Bundle' stamps and the 'Mermaid for you' stamps. 

Grab some painters tape too, you'll need to do a bit of masking. 


Tape off everything except the mermaids head. I measured where my tape would go, pulled the tape back to ink the stamp, then put the tape back. You DO NOT want ink on the tape. Stamp the boys head onto white cardstock, with a few inches of blank space below.  

You can see near his right cheek there was a small spot that did not get masked with tape. I was going to re-stamp but I thought you could learn from seeing my mistake, you really need to make sure your tape is on correctly! 

Using the long sleeve jammies stamps, stamp the image about 1/8" below the head. 

Using a pencil (then go over it with a marker), draw lines connecting the images. That will be the baby's neck. 


Once the baby has neck lines, start colouring him in. We chose blue and green, with blond hair but that's up to you! 


Once you have him all coloured in you'll have to fussy cut him. Luckily he has a fairly simple shape, so it's pretty easy. I cut his sleeves right up to the black line, I did not leave a white border. Now stamp and die cut another mermaid boy (or girl).


Now this is where it gets kind of interesting. You need to cut the mermaids arms off ( what!!!! no, we aren't sadistic over here)!!

With a little dab of glue, adhere the arms behind the baby, to create little hands (or those adorable little newborn mitts!) 


There he is! A perfect baby boy to adorn all those new baby cards!

How do you combine stamps to get the image you need? Share your ideas below! 

Have a great week everyone! 

Lori
xo